
Why You’ll Love This Italian Bread Recipe
When you try this Italian bread recipe, you’ll quickly see why it’s a favorite in my kitchen. The aroma that fills the air while it bakes is simply irresistible, making my mouth water in anticipation.
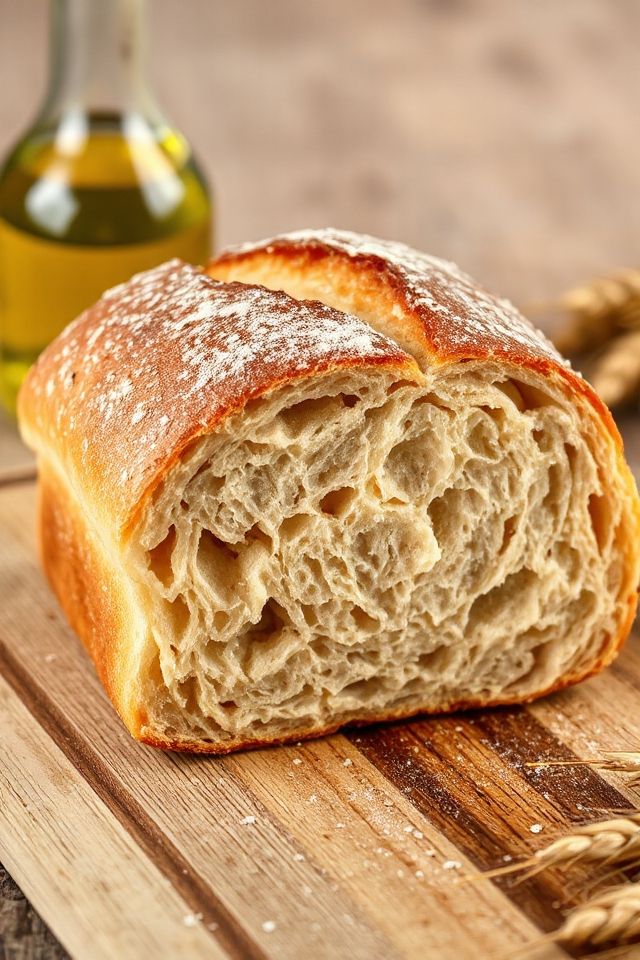
I love how crusty the exterior is, contrasting beautifully with the soft, fluffy interior. Each slice is perfect for sandwiches or simply slathered with butter. Plus, it’s surprisingly easy to make!
I appreciate that I can whip it up on a weekend and enjoy fresh bread all week. Trust me, once you make this, you’ll never want store-bought again. It’s that good!
Ingredients of Italian Bread
When it comes to making Italian bread, the right ingredients can make all the difference. You want to gather fresh, quality items that won’t only taste great but also give you that wonderful texture and aroma we all love.
So, before you don your apron and get ready to knead, let’s take a look at what you’ll need for this delightful recipe.
Here’s what you’ll need to whip up your very own Italian bread:
- 4 cups all-purpose flour
- 1 ½ cups warm water (about 110°F)
- 2 teaspoons sugar
- 1 tablespoon salt
- 2 teaspoons instant yeast
- 2 tablespoons olive oil (optional for extra flavor)
Now, let’s chat a bit about these ingredients. The flour is the backbone of your bread, so I always recommend using all-purpose flour; it’s versatile and gives that perfect crust.
Warm water is essential, too—too hot, and you’ll kill the yeast, and too cold, well, we don’t want our dough to be sluggish. And speaking of yeast, instant yeast is a game-changer because it doesn’t require proofing. Just toss it in with the dry ingredients, and you’re good to go.
Olive oil, while optional, adds a lovely richness and can enhance the flavor. If you’re feeling fancy, you could even drizzle some on top before baking.
How to Make Italian Bread
Making Italian bread at home is a rewarding experience, and trust me, it’s easier than it sounds. First things first, grab a large mixing bowl and combine your 4 cups of all-purpose flour with 2 teaspoons of sugar and 2 teaspoons of instant yeast. You can just toss those dry ingredients together—no need for fancy mixers or anything.
Then, sprinkle in the 1 tablespoon of salt. Here’s a little tip: make sure the salt doesn’t touch the yeast right away; it can be a bit of a party pooper for the yeast if it’s in contact too soon.
Now, let’s move on to the fun part. Heat up 1 ½ cups of water until it’s warm, but not so hot that it feels like a hot spring. You want it to be around 110°F, just warm enough to coax the yeast into action.
Pour that warm water right into the dry mixture, and if you’re feeling a tad adventurous, add in 2 tablespoons of olive oil for a flavor boost. Grab a wooden spoon or your hands—yes, I said your hands—and mix it all together until it forms a shaggy dough. It’s a bit messy, but hey, that’s part of the fun.
Once it’s all combined, you’ll want to knead the dough on a floured surface for about 8-10 minutes. This is where the magic happens, and your arm workout begins. The dough should become smooth and elastic, almost like a soft pillow waiting to rise.
After you’ve kneaded your dough like a champ, place it in a lightly greased bowl, cover it with a clean kitchen towel, and let it rise in a warm spot until it doubles in size—about an hour or so. It’s a great time to catch up on that show you’ve been meaning to watch or maybe even take a quick nap.
Once your dough has risen, punch it down (yes, really, give it a good punch) to release the air. Shape it into a loaf, place it on a baking sheet, and let it rest for another 30 minutes. Preheat your oven to 375°F while you wait.
After that, pop it in the oven and let it bake until golden brown, which usually takes about 25-30 minutes. The aroma? Oh, it’s going to make your kitchen smell heavenly.
When it’s done, let it cool for a bit before slicing—you’ll want to savor that first piece, trust me. Enjoy your homemade Italian bread, and don’t forget to brag about it a little; you’ve earned it!
Italian Bread Substitutions & Variations
If you’re looking to put a personal twist on your Italian bread, you’ve got plenty of options.
I love experimenting with different flours; swapping in whole wheat or semolina can add depth. For a herby kick, I toss in chopped fresh rosemary or thyme. If you prefer a sweeter note, a bit of honey or olive oil works wonders.
You can also shape the dough into rolls or a braided loaf for a fun presentation. And don’t forget about toppings! Sprinkling sea salt or sesame seeds right before baking adds a delightful crunch.
Get creative and make it your own!
What to Serve with Italian Bread
After exploring ways to personalize your Italian bread, it’s time to think about what to pair it with.
I love serving it with a rich marinara sauce for dipping or alongside a hearty bowl of minestrone soup. It also complements a fresh Caprese salad beautifully; the tangy mozzarella and basil enhance the bread’s flavor.
For a simple treat, spread some creamy butter or olive oil mixed with herbs. If you’re feeling adventurous, try it with bruschetta topped with tomatoes and basil.
No matter what you choose, Italian bread elevates any meal, making it truly memorable.
Additional Tips & Notes
While baking Italian bread can seem intimidating, a few helpful tips can make the process smoother and more enjoyable.
First, always measure your ingredients accurately; even a slight variation can affect the dough’s texture. I like to use a kitchen scale for precision.
Next, make certain your water is warm, not hot, to activate the yeast properly. Remember to knead the dough until it’s smooth and elastic—this can take about 10 minutes.
Finally, don’t rush the rising time; letting the dough rise until it doubles in size guarantees a light, airy loaf.
Enjoy the process and savor your delicious results!